How to Get Your Website on Google
Want to get your website onto Google? Follow our 2024 guide below to add your website into Google’s indexing. Let’s get searching!
-
Products and services that appear on CouchTripping.com may be from companies from which we receive compensation. Affiliated links allow us to earn revenue as an Amazon Associate. All available product choices may not be included, and we carefully consider the terms/rules of how products may be displayed or advertised at all times.
Products are reviewed fairly and objectively based on customer satisfaction, price, competition, features, and a number of other factors as well. Any ratings that may appear are based on the opinion of CouchTripping.com and its staff in good faith to provide the best product options for the described needs/scenario.
In 2024, Google has become synonymous with all forms of internet searching and is the common go-to website for finding anything online. Google’s built-in functionality with browsers such as Chrome and Mozilla Firefox as a default search engine make it one of the most desirable platforms to get your website featured on, and, in this guide, we will explore how to do just that.
Before beginning these steps, it is important to start by first creating your website! For example, this website (CouchTripping.com) was created using Squarespace, which even handles some of the following steps for you via direct integration with Google.
Now, without further ado, let’s begin.
1. Create a Sitemap & Set Up HTTPS
Once you create your website, it is important to create a sitemap and set up relevant security protocols/certifications for your site.
A sitemap is a file that is essentially exactly as it sounds, a map of all the pathways on your website. This file provides vital information for search engines and is used to help crawl your website, which is when a platform like Google goes through your website and indexes/catalogs everything that’s on there.
Imagine trying to explore a new city without a GPS. It’s definitely possible, but having some sort of map or directions makes the process that much easier, and this is basically the same process that search engines perform when they first index your website. A sitemap helps Google figure out where all the pages are on your website when it begins its crawling process.
Creating a sitemap can sometimes be a daunting process, especially for those that have limited experience with building a website, and there are different types of sitemaps that are best for different kinds of scenarios.
Luckily, many website-builder platforms, such as Squarespace, offer built-in services that will create your sitemap for you. Squarespace, for example, creates an XML-format sitemap automatically upon publishing your website, which can then be used to send to Google or other search engines.
In addition to creating a sitemap, you must also set up sufficient security protocols for transferring data from a web server to a browser. To do this, you must obtain an SSL certificate from an authorized authority, which enables you to use HTTPS on your website/domain.
Again, this may be a bit of a roadblock for those with less experience in building a website, and this step is often handled by website-builder platforms as well.
Determine the best path forward to suit your needs after building your website (through whichever means you have chosen), and once you have your sitemap and HTTPS set up, proceed to the next step.
2. Sign Up for Google Search Console
With a valid security certificate for HTTPS and a sitemap created for your website, head over to the landing page for Google’s Search Console tools.
These tools will allow you to submit your sitemap for search engine crawling, use URL inspection tools to determine if a webpage is eligible to be shown on Google, and view the performance of your website on Google’s platform.
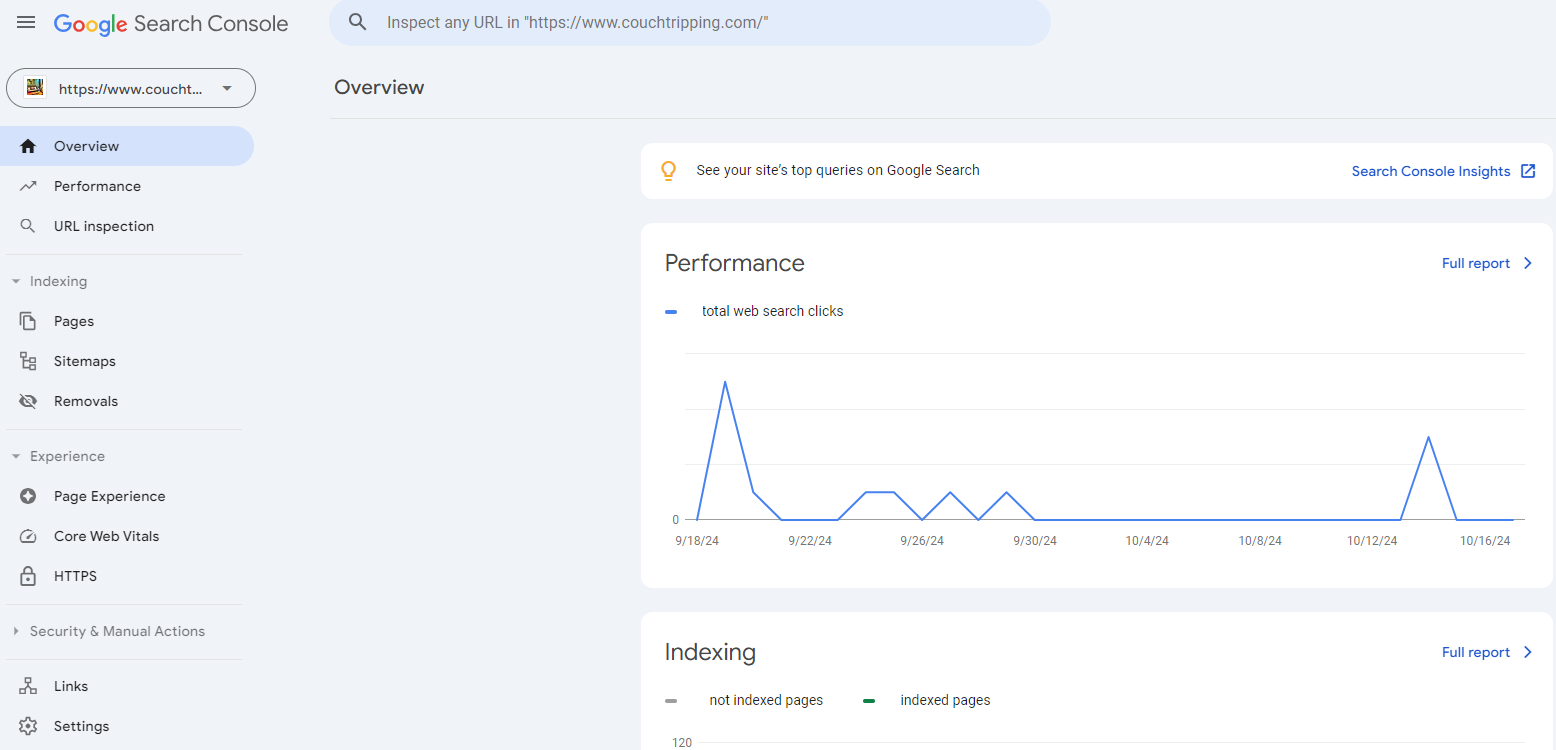
Login with any applicable Google account, tell Google what your website is, and navigate to the Overview page within the Google Search Console.
3. Submit Your Sitemap
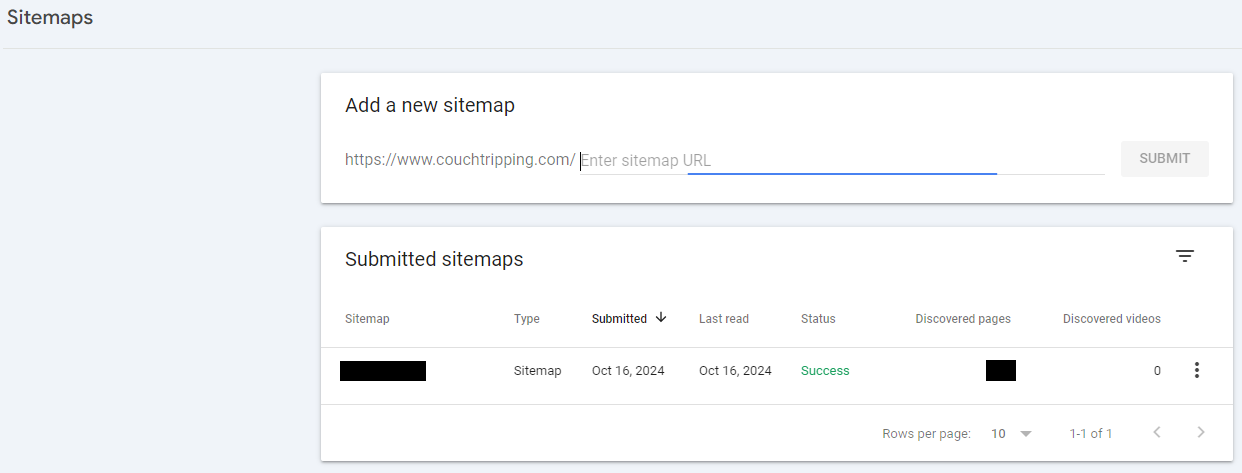
From the Overview page within the Google Search Console, navigate to the Sitemaps tab on the left side of the screen, underneath Indexing.
On this screen, you can type the location of your sitemap into the textbox, allowing Google to search for it and scan it.
If using a website-builder like Squarespace, this sitemap will likely be located somewhere like:
https://www.[your-website].com/sitemap.xml
Once submitted, Google will store this sitemap and periodically scan it for new content. You should only need to submit it once, but you can submit it more than once if you make significant changes. The “Last Read” date lets you know the last time that Google pulled information from your sitemap, and the “Discovered Pages” field lets you know how many linked pages it found.
The overall status of the sitemap submission can be found under the “Status” field.
With a sitemap submitted, your page will be able to be found on Google, even during the early days of your website. This process may take about a week to settle, so be sure to give it some time before your website appears as expected in a Google search.
Over time, Google will begin adding your webpages to its search index after performing regular crawls of your website.
Or, if you’re impatient (like me), you can proceed to the next couple steps to submit a handful of URL’s directly to Google for immediate crawling/indexing, though sometimes this process may take a day as a result of being placed in a queue.
4. Perform URL Inspection
In order to get your webpages on Google as soon as possible (after leaving a window of at least a few days or so after submitting your initial sitemap), you can submit URL’s directly for indexing.
But, before you can do this, you must first perform a URL inspection on each link, ensuring that your webpage meets Google standards and that no issues are found with displaying them on the search engine.
To do so, click on the URL Inspection tab underneath the Overview and Performance tabs or enter in your URL into the Inspection bar at the top of the screen.
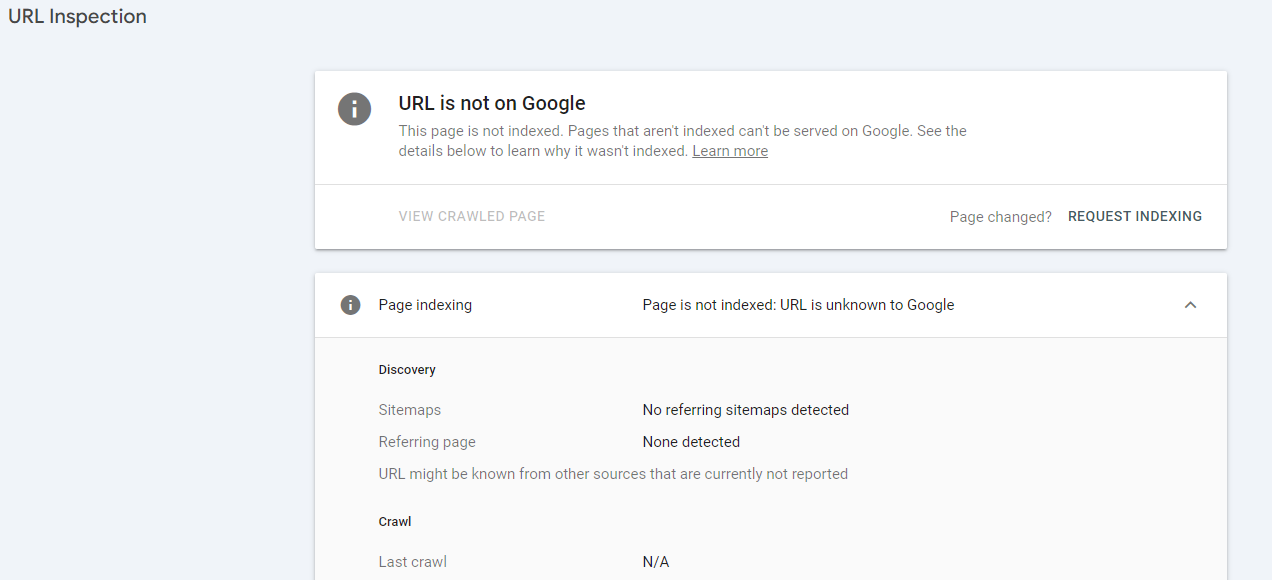
After submitting a URL for URL inspection, Google will show the results of what it found after searching the page. The most valuable result from this inspection is whether the URL is currently on Google or not, but other helpful information is present by clicking on the Page Indexing dropdown or by clicking on the View Crawled Page button.
Performing a URL inspection is necessary to enable the option for indexing your URL’s.
5. Index Your URL’s
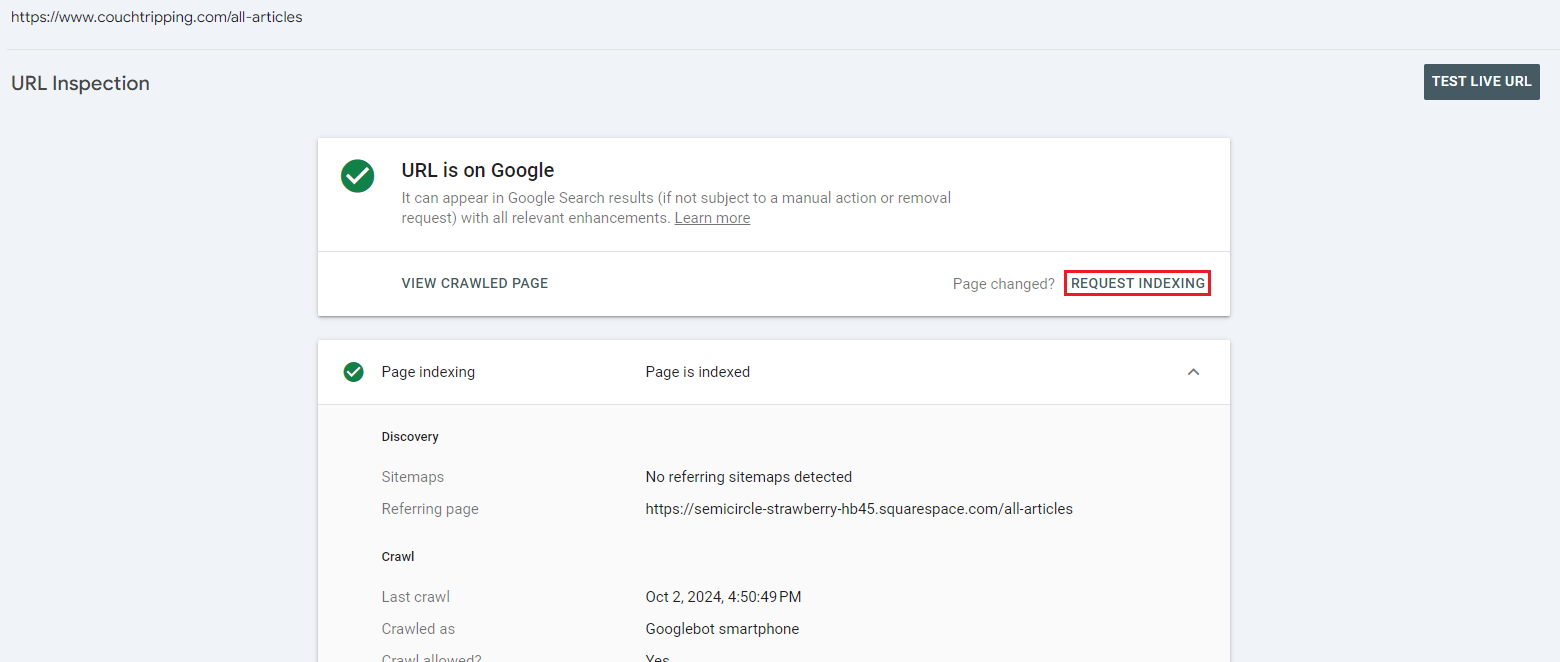
Once a URL inspection has been performed for your desired link, you may then click the Request Indexing button displayed on the results page to index your URL.
Indexing a URL is what allows the link to appear in a Google search, and pages that have not been indexed have not yet been cataloged by Google.
By clicking the Request Indexing button, you are essentially asking Google to prioritize adding your specific webpage to their list. Pages are added to Google in a queue-like system, and the indexing process may take a day or two even after clicking the Request Indexing button.
Feel free to inspect and index as many URL’s for your website as you choose to by repeating these steps. Then, check back later and re-perform the URL inspections in order to determine if Google has added your URL’s to its index yet.
6. Get to Googling!
Once your URL is on Google, the status will change on the URL inspection page, letting you know that it should now appear in any relevant Google searches.
You may rank low in the search order at first, but good search engine optimization (SEO) practices will help you improve your rank, ensuring your content is found for the search traffic or audience that you’re looking to garner.
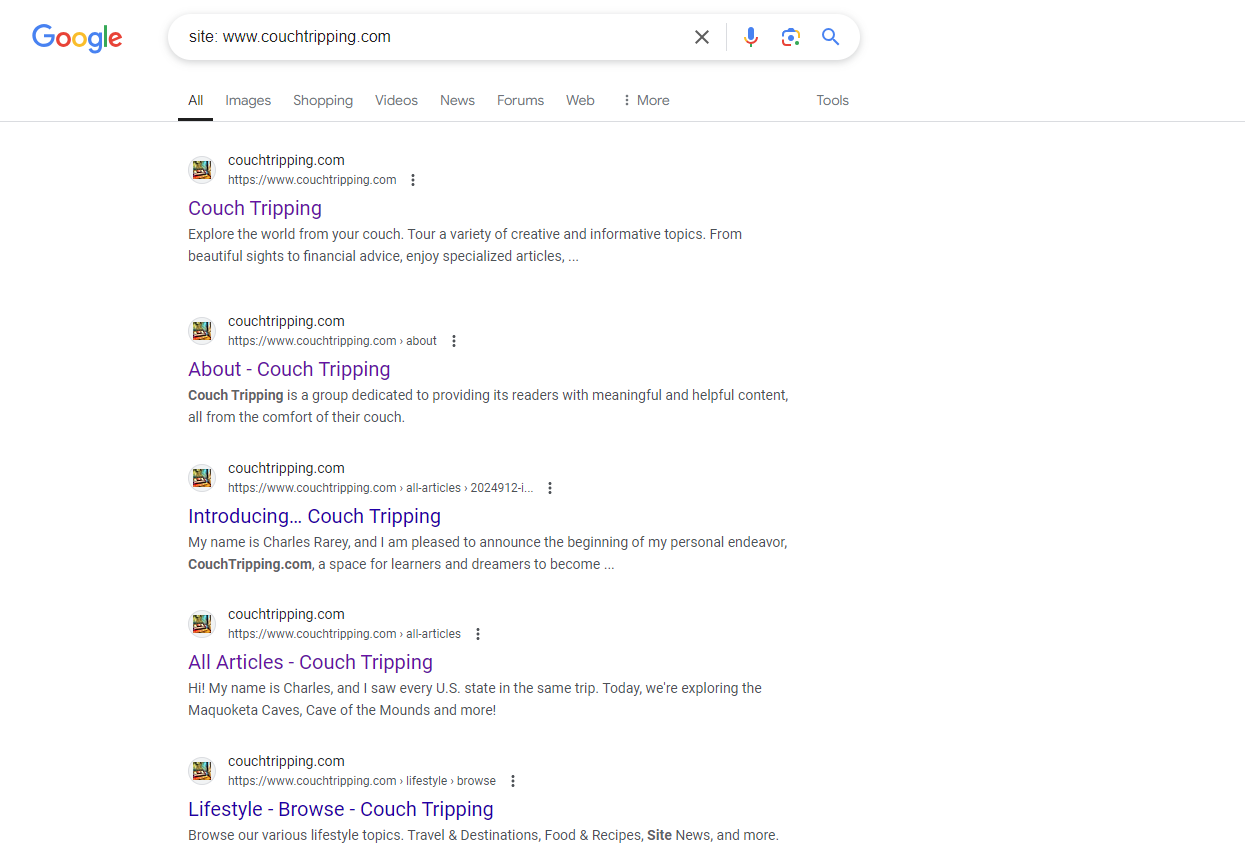
If you want to double-check whether your website is indeed appearing on Google searches, even if the ranking is low, you can add the following to your text query in Google to see only results that are from your site:
site: www.[your-website].com
For example, see a search result from our website, CouchTripping.com:
And that about wraps it up for this guide! If you found this information helpful or want to check out some of our other content, be sure to read more in our Business category or explore some of our most recent articles below.
