Excel Basics: Creating a Drop-Down List
Looking to add a drop-down menu into your Excel file? Read this tutorial and follow along in an example file as part of our Microsoft Excel Basics program. Let’s learn together!
-
Products and services that appear on CouchTripping.com may be from companies from which we receive compensation. Affiliated links allow us to earn revenue as an Amazon Associate. All available product choices may not be included, and we carefully consider the terms/rules of how products may be displayed or advertised at all times.
Products are reviewed fairly and objectively based on customer satisfaction, price, competition, features, and a number of other factors as well. Any ratings that may appear are based on the opinion of CouchTripping.com and its staff in good faith to provide the best product options for the described needs/scenario.
In Excel Basics, we aim to cover some tips to help get you started in your pursuit of adding more complex functionality into your spreadsheets, whether they be for budgeting, data entry, project tracking, or anything else.
Today, we’ll be helping you add a dropdown menu into your Excel sheet, which can be useful for identifying data that falls into a handful of categories.
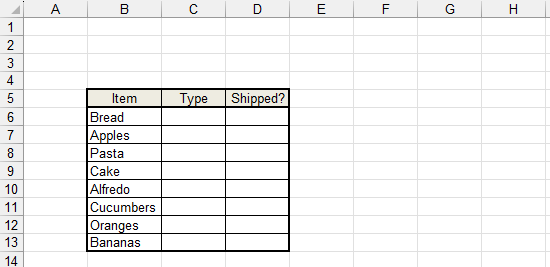
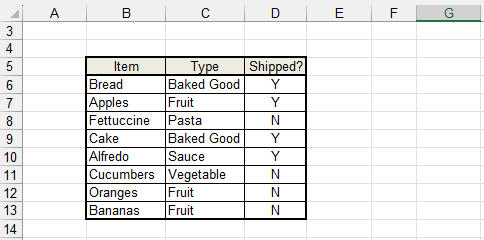
The example we will start with will be a very simple tracking sheet for a few food items. Food items like “Bread” and “Apples” are listed individually so that the “Type” of food they are can be identified from a dropdown list. Additionally, we will be adding in a column called “Shipped?” to determine if each of the items has been shipped yet. See the example below.
If you want to follow along with this example in Excel, feel free to download this example using the following link:
The test file contains the finished version of the example we will be covering, and you can start a new sheet within the file if you want to practice while you read this guide. At the end, you can then compare your version to what was already in the file to see how you did.
When creating a dropdown list in Excel, the different categories or options that you want to choose from should be listed and exist somewhere within the sheet. A good place to put these options may be the first couple of rows on the sheet, that way you can easily hide them when you’re done. You can also put them to the left or to the right of your working area on your sheet, but you will need to use extra caution if you ever decide to delete any rows to ensure that you don’t accidentally delete anything from your dropdown list.
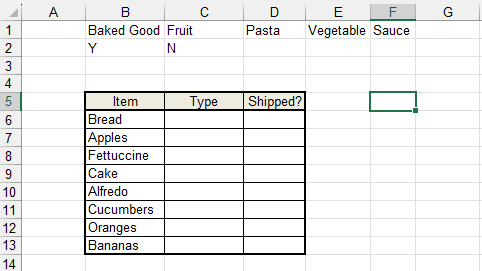
For this example, we are looking to list some types of food items that each food item could be. In the first row of the sheet, we have listed some categories: “Baked Good,” “Fruit,” “Pasta,” “Vegetable,” and “Sauce.” Next to each food item in the table, we want to be able to click on the cell next to it and select one of these types from the dropdown menu we’re creating.
In the second row of the sheet, we have also listed a “Y” and a “N.” This will be used to answer our question of whether a food item in the table has shipped or not, selecting the answer from a dropdown list for this column as well.
Now that we have each category for our dropdown menus listed out, how do we assign them to each cell? At the top of the Excel window, some tools are listed that perform all kinds of various functions. The one we’re looking for is called “Data Validation,” and it is located in the “Data” tab.
Click on one of the cells in the “Type” column. This will be the cell that we’re working with for Data Validation. Then, click “Data Validation” from the tools at the top of the screen to open the Data Validation window, which allows you to configure a cell to only show certain kinds of values on the sheet.
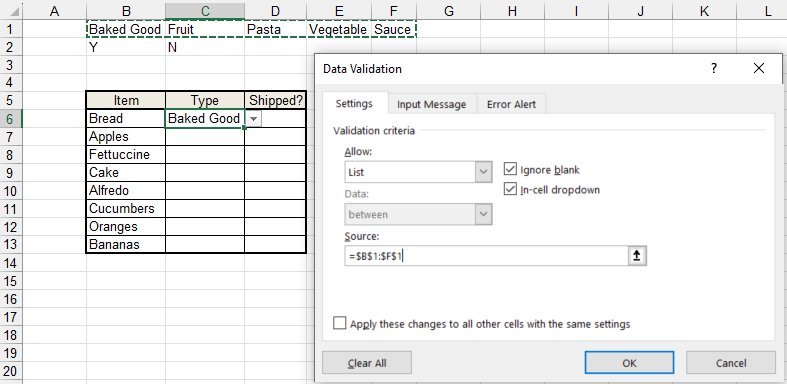
On the “Settings” page, under “Validation Criteria,” we want to only allow values from a List. Select this option from the “Allow” field. Then, we want to tell Excel which list it should be looking at as the source.
Click on the “Source” field and then highlight the range of cells that we are using as our food “Type” categories. Click “OK” at the bottom of the window to save the changes.
Now, we have successfully set up one of the cells in the “Type” column to only allow items from our defined categories, and a box has appeared on the side of this cell that we can click to open up our dropdown list! Apply these same settings to all of the cells in the “Type” column.
Once all of the cells in the “Type” column have the same Data Validation settings, we can go through the cells one-by-one and click on the dropdown menus to assign them one of the categories we set up.
With our “Type” column all set up, now it’s time to set up our “Shipped?” column. Click on one of the cells in the “Shipped?” column and then open up the Data Validation window as before.
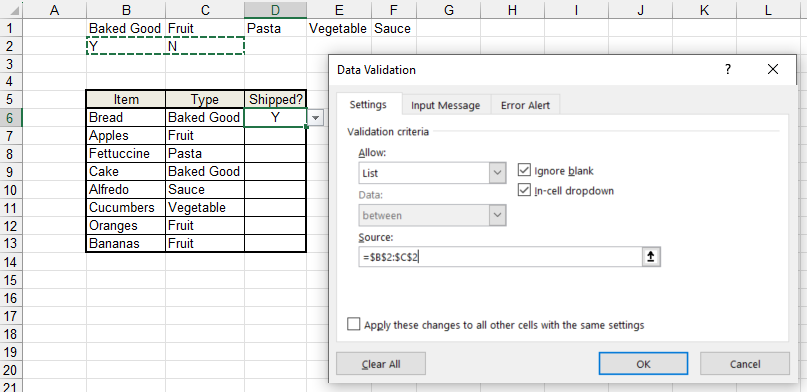
We want to use the same settings to configure the list for the “Shipped?” column, but this time, we want to pick a different source for the dropdown list to pull from. Click on the “Source” field in the Data Validation window, and then highlight the “Y” and “N” cells to pick our source for the “Shipped?” column. Once finished, apply these settings to all cells in the column.
Once all of the cells in the “Shipped?” column have the same Data Validation settings, we can go through the cells one-by-one and click on the dropdown menus like before. Then, when we’re all done, we can go ahead and hide the rows that had our dropdown menu categories in them, as they don’t have to be visible on the screen to still work.
And it’s really just as simple as that! If you liked this guide or want to learn more about Microsoft Excel, feel free to read more of our content in the Excel Basics program, or explore some of our most recent articles on the site below.
You can also check out one of our other tutorials that shows you how to add a dropdown list that changes based on other values in your sheet. Thanks for reading!
