Amazon Affiliate: How to Become an Amazon Associate
Are you someone with a following that is looking for new ways to grow their brand or income? Branching out into affiliated marketing has never been easier, and a great way to start is with the Amazon Associates program.
Updated for 2024, find out more about joining the Amazon Associates program below!
-
Products and services that appear on CouchTripping.com may be from companies from which we receive compensation. Affiliated links allow us to earn revenue as an Amazon Associate. All available product choices may not be included, and we carefully consider the terms/rules of how products may be displayed or advertised at all times.
Products are reviewed fairly and objectively based on customer satisfaction, price, competition, features, and a number of other factors as well. Any ratings that may appear are based on the opinion of CouchTripping.com and its staff in good faith to provide the best product options for the described needs/scenario.
1. Lay the Groundwork
Before you can become an Amazon Associate and collect commission earnings from affiliate links, you will need a space where you can post these links to a wider audience. Whether it be a website for personal or business intentions, there should be some form of clear foundation that guides the kind of content you will be advertising.
The Amazon Associates program inquires about the kind of audience you are intending to reach and checks to ensure that you are the rightful owner of the website or page in question (more on this below).
The product in no way has to be final, but laying some solid groundwork ahead of time can help your application and ensure that you are able to adhere to all requirements for joining the Amazon Associates program.
2. Go to the Amazon Associates Webpage
Once you feel that you are ready, head to the Amazon Associates home page and read the policies and requirements at the Program Policies link at the bottom of the page.
Note: Website affiliate links and social media affiliate links are covered under separate programs. Those looking to advertise in a social media space may instead need the Amazon Influencer Program.
The policies should be fully understood before proceeding to ensure that your webpage adheres to all terms/rules. You can find a basic summary of these rules below, but be sure to read them from the Amazon Associate page yourself as well in case of any future changes:
Website must not be marketed towards children 13 or under.
No redirecting links. Website visitors must not be taken to the link unless they click on it.
Minimum payment of $10 for direct deposit or gift card payment. Minimum payment of $100 for check payment, minus a $15 processing fee. Payments not dispersed until these minimum values are reached.
No harmful, illegal, discriminatory, explicit, or otherwise obscene materials.
No false/deceptive information about products being linked.
Prices must be excluded or must be kept up-to-date at all times.
Disclaimer present on site to inform visitors of affiliation status (more on this below).
3. Click “Sign Up”

After reading and becoming comfortable with the Program Policies for the Amazon Associates program, return to the home page and click “Sign Up.”
You will then be greeted with a prompt to log in with your current Amazon account or to create a new one.
Sign in or create an account to proceed. Then, choose which associated member under the Amazon account should receive the payment from any commissions earned from the program.
You will then see a screen such as the one below:
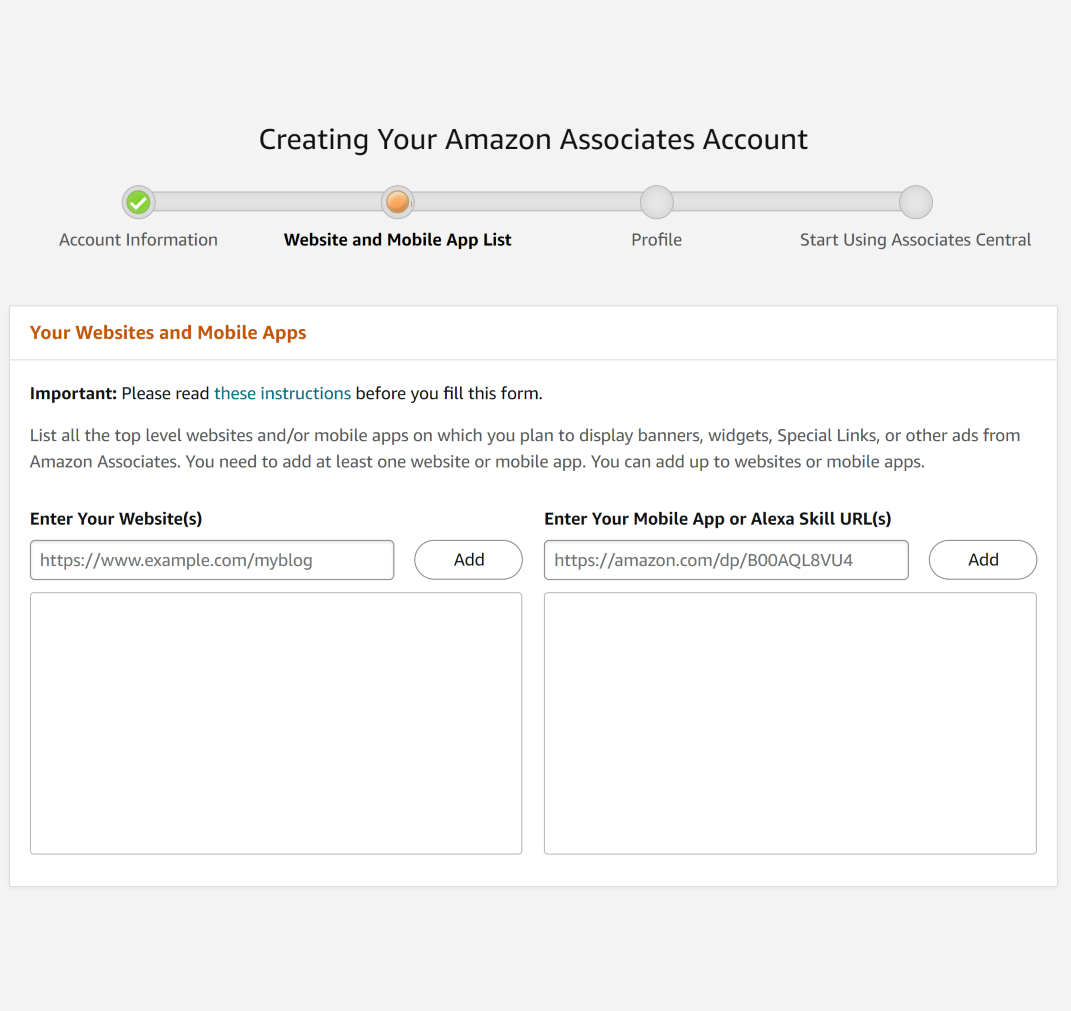
On this screen, you will want to enter in the websites or mobile apps you will be posting affiliate links on. For the purposes of this guide, we will assume that you have one (1) website to add to this list.
Type in your website’s URL into the space provided, and then click “Add.” The website will show up in the list, and you may then proceed to the next section.
4. Choose Your Affiliate Store Name

On the next screen, you will be greeted with a form such as the one above. You will now have the opportunity to choose your Amazon Associates Store Name/ID.
Your Amazon Associates Store ID is a representation of your website or product within Amazon’s network, and it should ideally be chosen to match the name of your brand. A suffix of “-20” is commonly appended to your Store ID automatically after typing a name.
For example, the Store ID for this page, Couch Tripping, is simply: “couchtripping-20”
If your desired name is already taken, you may have to play with some variations until you are fully satisfied.
This Store ID will be included in all affiliate links you generate from Amazon. But don’t worry if you end up with an ID that wasn’t your first choice! The Store ID is often buried in a long string of text, and any visitor that clicks on an affiliate link likely won’t notice its presence unless they go looking for it.
5. Describe Your Business / Media
After choosing an appropriate Amazon Associates Store ID, you will then be required to tell Amazon about the kind of content you provide on your website. The intention of this description is to get a feel for what kinds of audiences you are targeting and how affiliate links might be accessed or displayed.
Describe what your site’s visitors are able to do, who you are trying to reach, what kinds of products you are interested in promoting, and anything else you can think of that may be relevant.
Choose a category for your site from the available options, and then proceed to the next screen.
6. Link a Payment Method
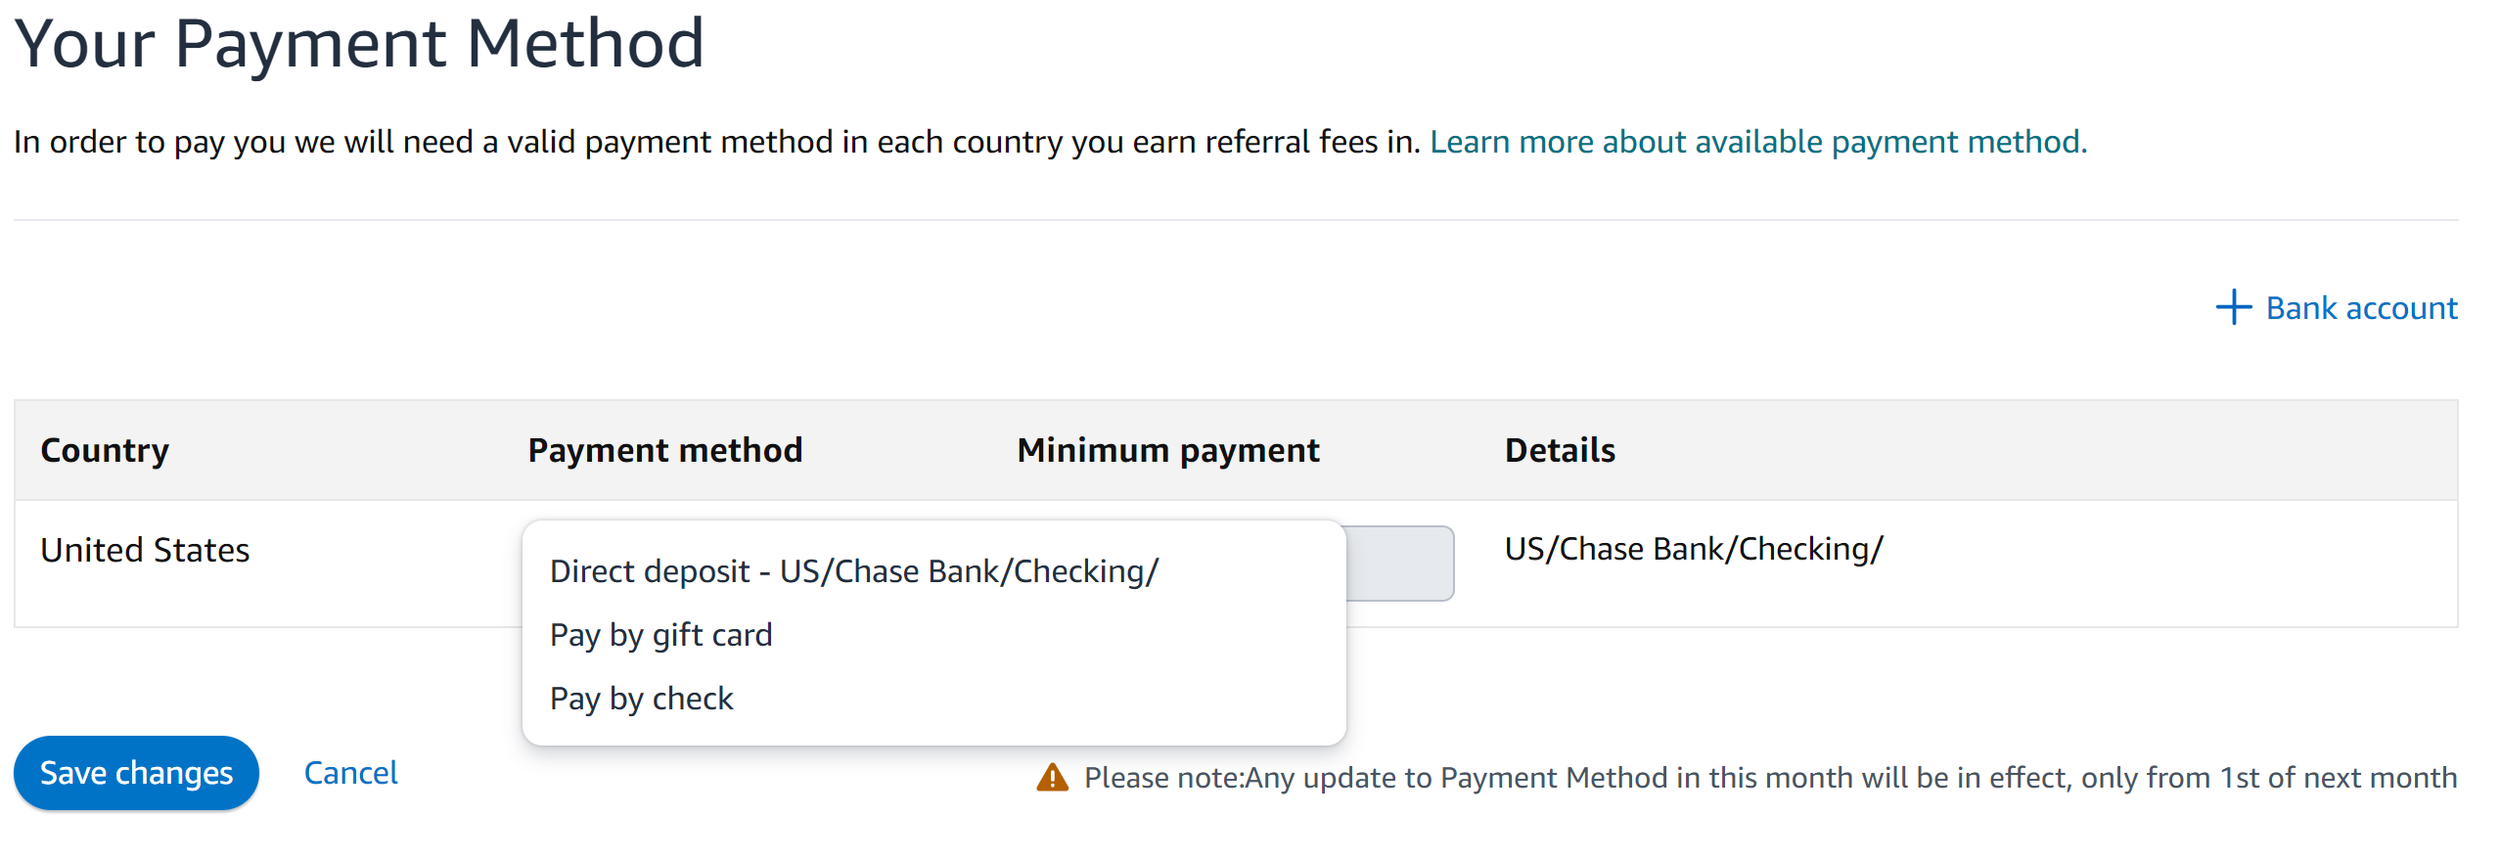
Upon completion of your Amazon Associates profile, you may be greeted with the payment method screen above.
If not, no worries, just head to your new Amazon Associates Central home page and click on Account Settings from the top left corner of the screen (drop-down from your displayed email address). From there, click “Change Payment Method” under the Payment and Tax Information category.
Once you are on the Payment Method screen, you will be able to choose how you would like to receive payment from Amazon for your earned commissions. Commissions are earned based on product type, and a breakdown list is available on Amazon’s site here.
You are able to receive payment from Amazon Associates via direct deposit, Amazon gift card, or by check. For more information about each of these payment options, please see the information below:
-
$10 must be earned before a payment may be issued.
Bank account must be linked before this option will show as available. Click "+ Bank Account" in the top left corner of the page to link a bank account.
Funds are deposited directly to the chosen bank account once linked and the minimum payment has been met.
-
$10 must be earned before a payment may be issued.
Funds are distributed as a gift card usable only on Amazon's storefront.
Gift cards may only be used on the Amazon site from which the commission was earned.
-
$100 must be earned before a payment may be issued.
Funds are distributed via a mailed check to the physical address provided during account setup.
$15 processing fee is deducted each time a check is issued.
Once you have chosen your desired method of payment, save your changes. Note that there may be a waiting period for any changes to be reflected if you decide to change them after initial setup.
7. Provide Tax Information

Before you can be paid after choosing a payment method for your Amazon Associates commissions, you must also provide Amazon with your tax information.
You can reach this page within the same Account Settings as the payment method. Under “Payment and Tax Information,” choose the option labeled: “[Your Country] Current Tax Status.”
Within this option, you will be asked to provide information necessary to file your country’s applicable tax paperwork for earnings. For reference, in the Unites States, your social security number (SSN) is required to complete a fairly basic W-9 form.
This process doesn’t take too long and can be completed in less than a few minutes.
8. Disclose Your Amazon Affiliation
As mentioned previously, one of the requirements for providing affiliate links on your website is a disclaimer or disclosure that informs your readers of the advertisements they will be subject to.
The advertising disclosure we use on Couch Tripping may be seen below as an example. You may also have noticed it when you first starting reading this article!
-
Products and services that appear on CouchTripping.com may be from companies from which we receive compensation. Affiliated links allow us to earn revenue as an Amazon Associate. All available product choices may not be included, and we carefully consider the terms/rules of how products may be displayed or advertised at all times.
Products are reviewed fairly and objectively based on customer satisfaction, price, competition, features, and a number of other factors as well. Any ratings that may appear are based on the opinion of CouchTripping.com and its staff in good faith to provide the best product options for the described needs/scenario.
The disclaimer must be truthful and upfront about the nature of the content’s affiliated status, indicating that the site may earn compensation from visitors’ traffic. These disclosure statements should be placed anywhere affiliated links may be displayed.
9. Choose a Product to Link

Now that you’re all set up with an Amazon Associates Store ID, you can begin generating affiliate links. But first, you must choose an appropriate product to link on your page.
Maybe you have something in mind already that’s driving your interest in affiliated marketing in the first place. That’s great! Be mindful that you are also creating a space full of original content of your own to provide context and meaning to the links, encouraging visitors to interact with the links and adhering to Amazon’s Program Policies of how affiliated links should be presented.
Take, for instance, our recent article about our top pick for 2024’s Best Digital Picture Frame (which, by the way, was the Aura Walden 15” WiFi Frame). This article is a great example of how to weave a large number of affiliated links into a natural, appealing format without overwhelming the reader or making them feel pressured.
Starting with a solid topic or comparison piece can help cultivate an audience that is already interested in the products you would be recommending to them. These kinds of visitors would be more likely to purchase as a result, especially if you are doing them a service in helping them decide which product to choose.
10. Generate Your Affiliate Link

With a strong understanding of which products you are wanting to promote, you can visit the home page of Amazon.com to be greeted with a new toolbar at the top of your screen.
This toolbar is called “SiteStripe” and it appears whenever you are logged in under the same Amazon account as the one you used to register for Amazon Associates.
With SiteStripe, you can generate links of product pages with your Amazon Associates Store ID already included and properly formatted.
Here are some basic instructions on how to generate links with SiteStripe:
Navigate to the product you want to link to on Amazon.
Look for the SiteStripe toolbar at the top of the screen. Login with the same account used for Amazon Associates if it does not appear.
Underneath the “Get Link” section, choose the type of link you prefer. At Couch Tripping, we utilize “Text” links the most.
Click the “Text” button if you are generating a standard text link. Otherwise, click on the appropriate option for your chosen link type.
A link will be generated automatically. Copy this to your clipboard.
Done! You now have a affiliated link in your clipboard that you can paste wherever you decide.
11. Get to Linking!

Now that you have the ability to generate your own affiliated links as an Amazon Associate, you are free to promote products to your heart’s content, earning a pre-determined commission on each sale you drive.
Be aware that for most new Amazon Associates, a total of three (3) qualifying commissions must be earned within the first one-hundred eighty (180) days following your application submission in order to be fully-accepted into the program (at the time of current writing).
As previously mentioned, our recent article about 2024’s Best Digital Picture Frame is a great example of how you might integrate affiliated links into your own content. For more examples or other relevant articles, feel free to explore our site, or read some of our most recent articles below.